|
Air Conditioning Circuit and Cycle DiagramPlease feel free to copy this air conditioning circuit and cycle diagram and print it out. 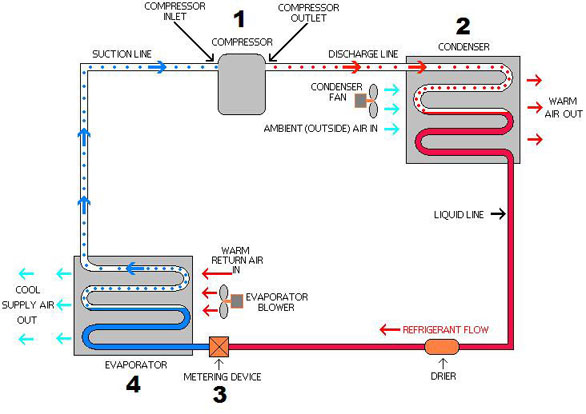
The component at #1 in this air conditioning circuit and cycle The compressor is the heart of the system; it keeps the refrigerant flowing through the system at specific rates of flow, and at specific pressures. It takes refrigerant vapor in from the low pressure side of the circuit, and discharges it at a much higher pressure into the high side of the circuit. The rate of flow through the system will depend on the size of the unit, And the operating pressures will depend on the refrigerant being used and the desired evaporator temperature. The component at #2 in this air conditioning circuit and cycle diagram is the condenser. The red dots inside the piping represent discharge vapor. The solid red color represents high pressure liquid refrigerant. Most air cooled air conditioning and refrigeration systems are designed so that the refrigerant will condense at a temperature about 25 to 30 degrees above outside ambient air temperature. When the hot refrigerant vapor discharged from the compressor travels through the condenser, the cool air flowing through the condenser coil absorbs enough heat from the vapor to cause it to condense. If the outside air temperature is 80 degrees, the system is designed so that the temperature of the refrigerant, right at the point where it first condenses, will be about 105 to 115 degrees. Why do we want the refrigerant to condense at this relatively high temperature? So that the air will be very cold relative to the temperature of the discharge vapor, Which will allow the latent heat energy in the vapor to transfer over to that relatively cold air, And cause the refrigerant to condense. This transfer of heat from the vapor to the flowing air is what makes hot air blow out of your air conditioner's condensing unit. At this stage in the air conditioning circuit and cycle diagram, high pressure liquid refrigerant will flow down the liquid line, through a filter drier that is designed to prevent contaminants from flowing through the system, and on to the metering device. The metering device, component #3 on this air conditioning circuit and cycle diagram, is the dividing point between the high pressure and low pressure sides of the system, And is designed to maintain a specific rate of flow of refrigerant into the low side of the system. If the wrong capacity of metering device is used, or if there is a problem with the metering device, An incorrect quantity of refrigerant will flow into the evaporator. When the refrigerant passes through the metering device, it drops from about 225 psi to about 70 psi, It also drops in temperature from about 110 degrees to about 40 degrees, It starts evaporating immediately, And it wouldn't be too inaccurate to imagine it acting like warm soda when you shake the bottle and pop the top off. It shoots out into the evaporator foaming, bubbling, and boiling, And remember, it's at a low pressure, so it's only boiling at about 40 degrees F. And that brings us to the evaporator, component #4 in the air conditioning circuit and cycle diagram. There will be relatively warm air flowing over the evaporator coil, lets say about 80 degrees. The air conditiong system is designed so that the refrigerant will evaporate in the evaporator at a temperature of about 40 degrees, so that it will be cold compared to the warm air flowing over it. The system is designed so that the heat in the warm air flowing over the evaporator will be absorbed by the cold evaporating refrigerant. This cools the air flowing over the evaporator, and is the reason cold air blows out of your air conditioner. I hope this air conditioning circuit and cycle diagram has helped you understand air conditioning systems, and once again, feel to copy it and print it out. You'll find a more complete diagram that you can use for troubleshooting, with some tips about the operating characterisitcs to look for, in our System Evaluation Manual; and please, feel free to contact us with any specific HVAC questions you might have, including questions about air conditioning on Guam, and refrigeration on Guam.
Return from Air Conditioning Circuit and Cycle Diagram to the Air Conditioning and Refrigeration Guide home page. |
